The short answer
To make a certificate of authenticity:
- Decide who issues it: you as the artist or maker, your studio, or the gallery that represents the work.
- Gather the details: title, artist, year, medium and exact size.
- Write a short statement that says only what you can confirm.
- Add a clear photo of the work and a unique certificate number.
- Number it if it belongs to an edition, for example 7/25.
- Print it at 100%, sign it by hand and keep a copy.
A certificate of authenticity is one page that names a specific work and carries your signed statement about it. It travels with the work when you sell it, and it gives you a tidy record of what left the studio. You can follow along in our certificate of authenticity template: it walks through the same details beside a live certificate.
Here is the certificate we will build, for a fictional oil painting by Clara Vance. The numbers mark the part each step fills in.
- Who issues it
- The work: title, medium, year, size
- The statement
- Photo and certificate number
- Edition
- Signature and date
Step 1: Decide who issues it
The issuer is the person or business making the statement on the certificate. Pick the role that is true for this work, because it changes the wording and the line under the signature:
- Artist / maker. You made the work yourself. The certificate is signed above “Artist signature”.
- Studio / brand. The work was made in your studio or workshop, perhaps by a named maker. Signed above “Authorized signature”.
- Gallery / representative. You sell or represent the artist’s work. Signed above “Signed for the gallery”.
Only issue a certificate for work you made or that you legitimately represent. If you bought a piece and want proof it is genuine, a certificate you write yourself cannot give that: ask the artist, their studio or the gallery that sold it. Making one for your own painting, drawing or sculpture? The artwork certificate page starts you with the right fields.
Step 2: Gather the details of the work
A buyer should be able to pick out the work from the certificate alone. Write down:
- Title. If the work has no title, write Untitled and rely on the photo and the other details.
- Artist or maker. The full name you sign with, spelled the same way on every certificate.
- Year the work was finished.
- Medium, specific enough to tell the work apart: “Oil on linen”, not “painting”; “Archival pigment print on 308 gsm cotton rag paper”, not “print”.
- Size with the unit, in the same order on every certificate you issue. For works on paper, say whether it is the image or the sheet.
The full list of what to include also covers series, care notes and what to leave off.
Filled examples for three kinds of work
The same steps give a different certificate for a painting, an edition print and a handmade object. Open any of them to start from it.
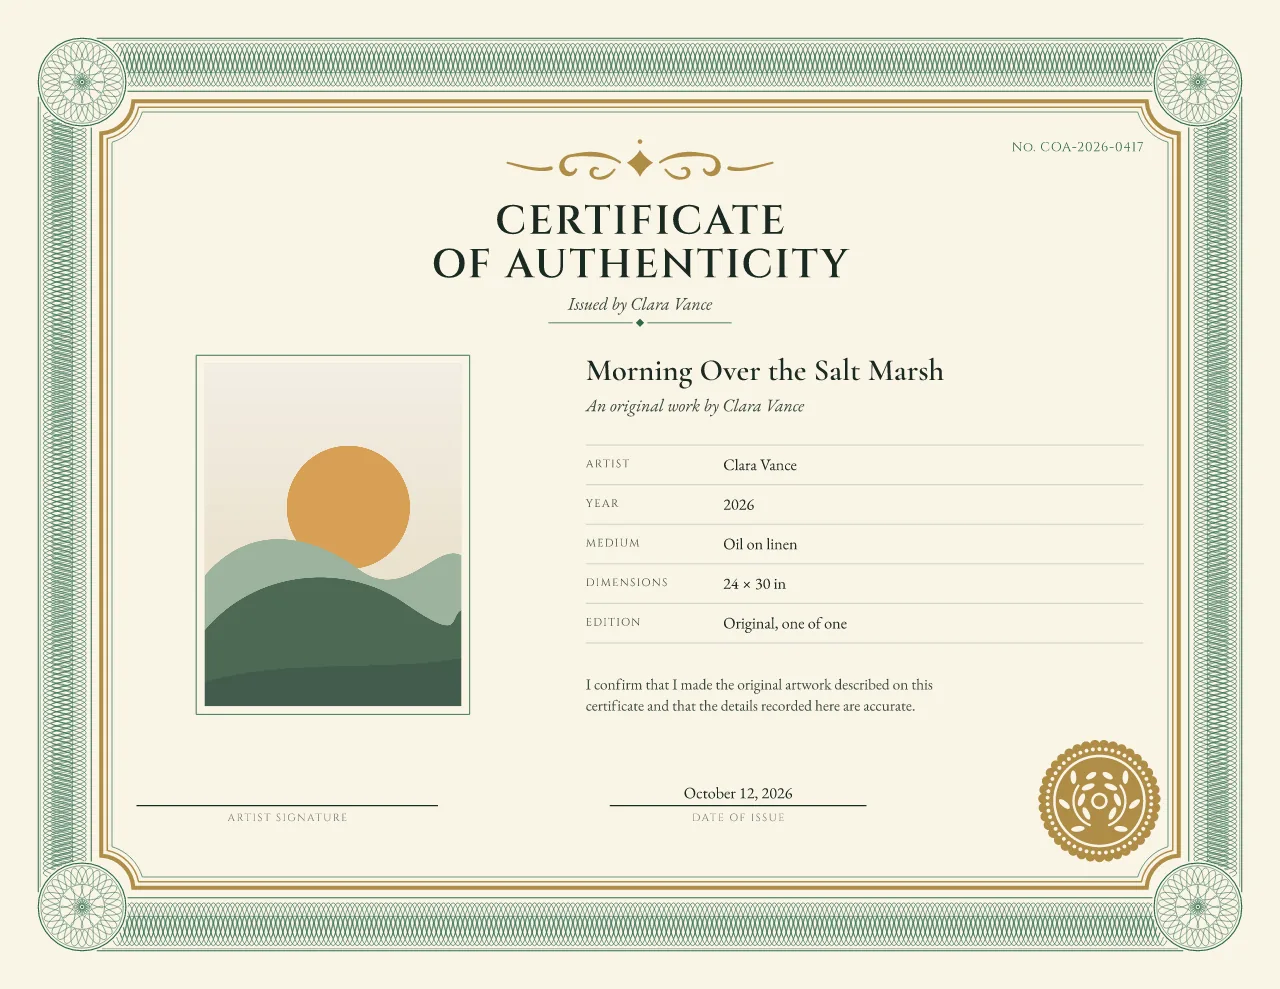
Sovereign design
Original painting
An original painting, issued by the artist.
- Issued by
- Clara Vance
- Work
- Morning Over the Salt Marsh
- Medium
- Oil on linen
- Size
- 24 × 30 in
- Edition
- Original, one of one
- Certificate no.
- COA-2026-0417
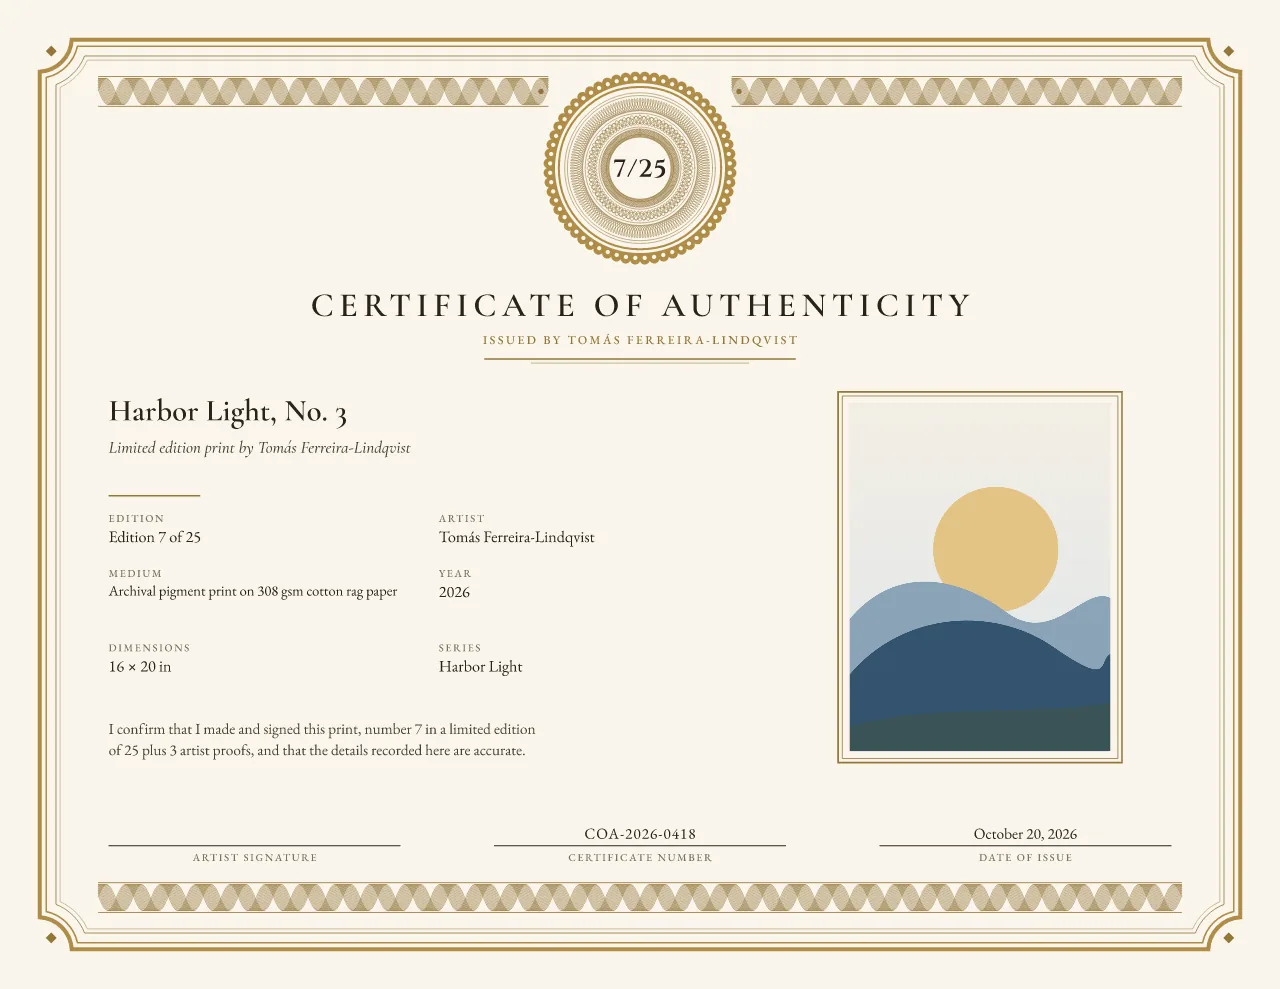
Edition Rosette design
Limited edition print, 7/25
Print 7/25 of a limited edition, with a long accented name kept intact.
- Issued by
- Tomás Ferreira-Lindqvist
- Work
- Harbor Light, No. 3
- Medium
- Archival pigment print on 308 gsm cotton rag paper
- Size
- 16 × 20 in
- Edition
- Edition 7 of 25
- Certificate no.
- COA-2026-0418
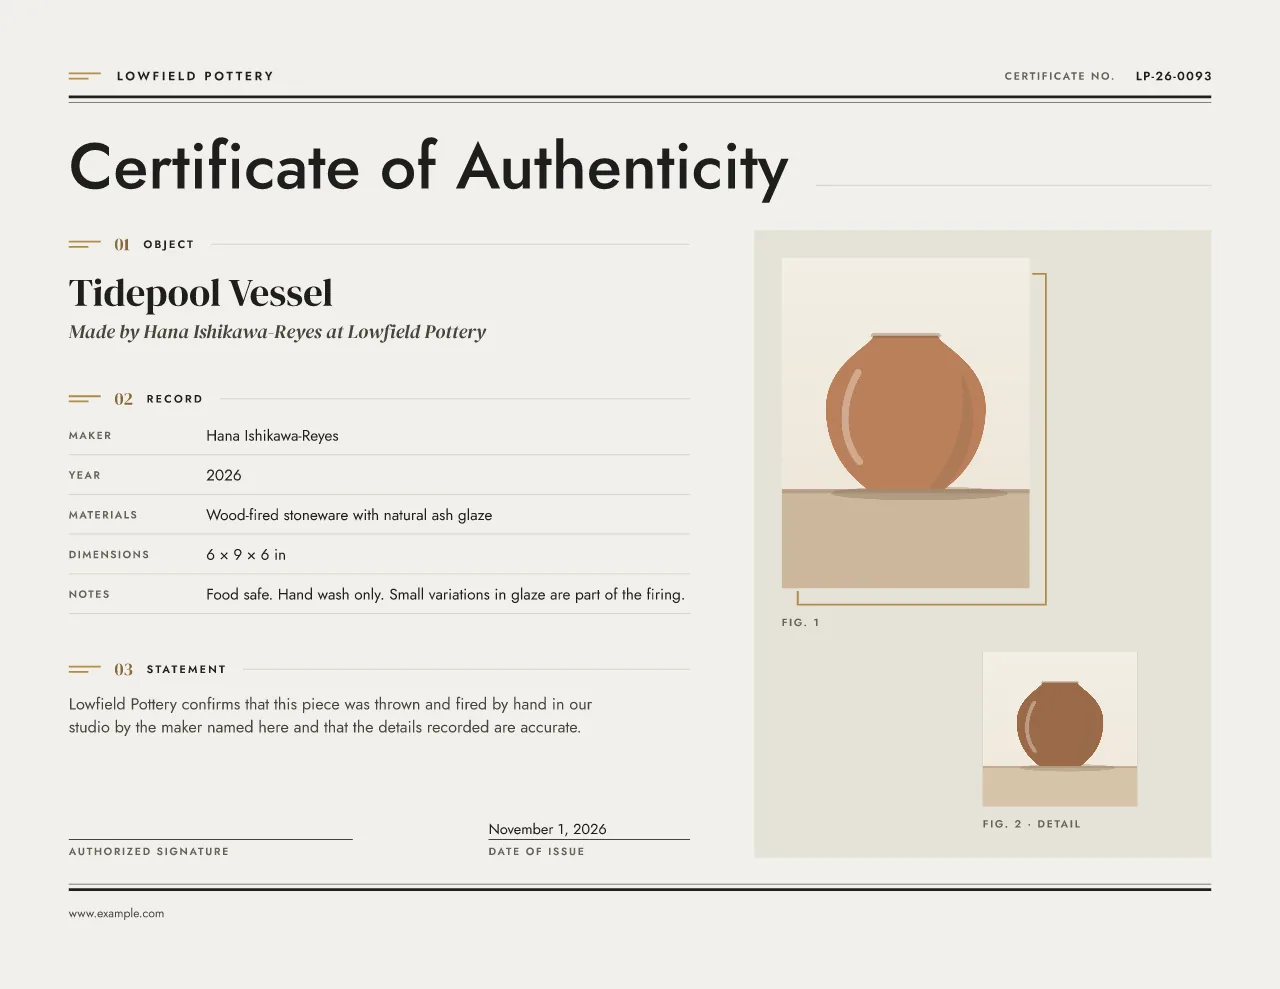
Object Archive design
Handmade ceramic vessel
A studio piece: the studio issues it and names the maker.
- Issued by
- Lowfield Pottery
- Work
- Tidepool Vessel
- Medium
- Wood-fired stoneware with natural ash glaze
- Size
- 6 × 9 × 6 in
- Certificate no.
- LP-26-0093
Step 3: Write the statement
The statement is one or two sentences in your own voice. It says what you made or what you know, and that the details are accurate. Our editor starts artists with this wording, which you can change:
I confirm that the artwork described here was made by me and that the recorded details are accurate.
Keep it plain. “I made this” is a stronger statement than a paragraph of legal-sounding words, and it is one you can stand behind. Avoid “guaranteed”, “certified” or “verified”: a certificate records your statement; it does not certify anything on its own. For editions, studios and galleries, see the statement wording examples.
Step 4: Add a photo and a certificate number
The photo ties the certificate to one physical piece, which matters most for originals and unique objects. Photograph the whole work square-on in even daylight, with no frame glare and no filter. Our editor fits the entire image by default and crops only if you ask it to. It accepts JPEG, PNG or WebP up to 20 MB and shows the effective print resolution: aim for about 300 ppi at the printed size.
The certificate number identifies the certificate itself, for example COA-2026-0417. Give every
certificate its own number and never reuse one, even for a reprint of the same work. It is not the edition number: “7/25” says which
print it is; the certificate number says which document you issued. Keep a simple list of numbers, titles and buyers in your own records.
Step 5: Number it if it is part of an edition
Choose the edition that matches the work:
- Original: a unique work, printed as “Original, one of one”.
- Limited edition: the print’s number and the edition size, such as “Edition 7 of 25” (7/25).
- Artist proof: a proof outside the numbered edition, such as AP 2/3.
- Open edition: no fixed total, so no number.
The total never changes once the first print is sold, and every print gets its own certificate with its own number. Our guide to numbering prints covers where the marks go on the print, and the certificates for a print edition page keeps the total the same across a run.
Step 6: Sign, print and keep a copy
Sign by hand. A pen signature on the printed line is the default and the one buyers trust most. Use an archival ink that does not fade, add the date, and sign the same way you sign the work. You can also place a typed name or a scan of your signature; that is a visual element, not a digital signature.
Print at 100% / Actual size, with “Fit to page” turned off, so the border and margins stay where they were drawn. A heavier matte paper or card stock feels right in the hand and takes ink well. For a gold or silver finish, send the foil printing files to a printer who offers foil and let them review them.
Keep a copy. Save the PDF with the work’s title in the file name. A free account also keeps every certificate you download exactly as issued, so you can reprint it, make the next edition number or issue a corrected version later.
Mistakes to avoid
- Putting the price or the buyer’s name on it. Both belong on the invoice. A certificate without them can pass to the next owner.
- Vague details. “Mixed media, medium size” could describe hundreds of works.
- Reusing numbers. Each certificate and each edition number is used once.
- Changing an edition size after you have started selling it.
- Claiming more than you can. Say what you made or represent; leave out “guaranteed” and “certified genuine”.
- No copy for yourself. If a buyer asks years later, your record is the only one.
What a certificate can and cannot do